Most of us get in elevators, ride trains and board airplanes without thinking about the danger. It became widespread to trust technology – or at least those parts that have been surrounding us ever since we were born. We were taught that these devices are safe. Nothing operates perfectly of course, but these devices manage to keep the severity of failures to a minimum somehow. However, in the IT world, having a few errors in projects with millions of lines of code is more than common. So how is it that these systems can still operate safely?
Safety critical development
In safety-critical and also mixed-criticality systems – such as ours – it is very important to ensure the correctness not only at design time, but also at the working of the system. Traditional verification, as it was introduced in former post, can find design problems early in the design process. However, it would be a great idea to use the formally verified specification also at runtime to check if the runs of the system conforms to the specification.
There are many problems which cannot be handled by traditional design time verification. We generate the code from the design models. However, there is no assurance, that the code generator is correct. The second problem is that we can not verify our hardware. Problems caused by the hardware cannot be taken into account in the verification of the distributed logic. In addition, there can be transient or permanent errors in the components caused by short-circuit or many other kinds of events. Communication problems might result the loss of messages in the system, or errors in the network components might cause huge problems in the system.
Actually, in our small system we have faced many of the aforementioned problems, especially network delays caused serious problems and “accidents”.
Runtime verification
The output of running systems can be validated by external components checking conformance. For complex systems, only safety critical parts are monitored to be cost efficient. Our approach is to generate small monitors receiving the same inputs as the running component and verifies if the output is correct. Erroneous behavior can usually be detected by much smaller components. Imagine for example an airplane that with a safety criteria that it’s acceleration can’t go above 30m/s^2. The components that control the exact power of the engines can be complex, and done by many different parts of the system. Any error anywhere in the chain could lead to faulty behavior. A single component at the end can monitor the result, and if the final value would result in an acceleration higher than 30m/s^2, can signal an error. Such monitors are simple and efficient means to check certain properties.
Workflow
Monitoring components have a much lower complexity than the system itself, so they can easily be generated from models and we can trust in their correctness in a higher confidence. One of the most widely known modeling methods in the engineering world is statechart based modeling, so our approach is based on engineers creating statechart models, which then can be used to generate monitoring components with minimal non-generated code (glue code required to connect signals in the statecharts to the actual systems that they monitor).
Statechart based monitors
There are many flavors of statechart languages from low level ones which resemble state machines, to complex ones like UML statecharts. Our goal was to develop an intuitive and highly expressive statechart language with features like error state annotation to make monitor generation easy. A simple statechart can be described as following:
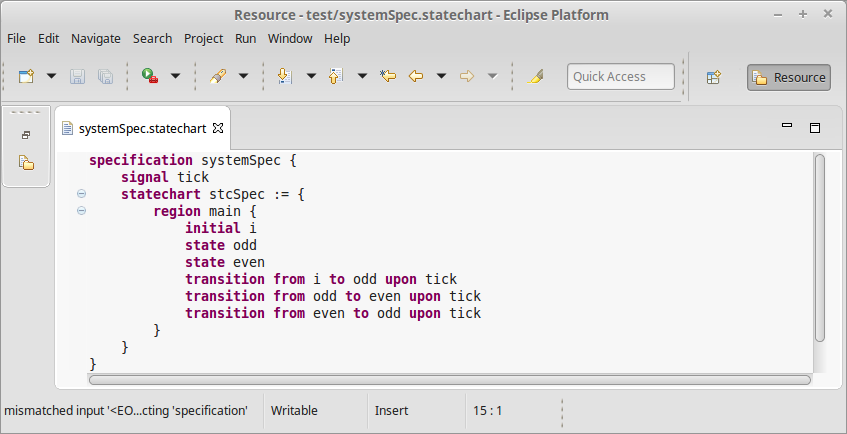
The described system simply switches between an odd and an even state on every tick signal. The features of the UML statecharts are fully available (entry and exit actions, state hierarchy, etc) with a few extensions, like parametrized handling of certain situation. A system specification can hold multiple statechart definitions which can communicate via shared signals.
Monitor generation from statecharts
We had a few ideas on how monitor generation should work, from flat, highly efficient monitors to high level ones that preserves the statechart’s hierarchy in the code itself (creating easily extendable and readable source files in the process). We also had a few options somewhere between the two extremities, but most systems either have a lot, or nearly no extra computing power that can be used for monitoring, so a midways approach isn’t really necessary. We ended up implementing most of the functionality for both the high and the low level monitor generators. So, let’s dive into how they work!
High level monitor generation
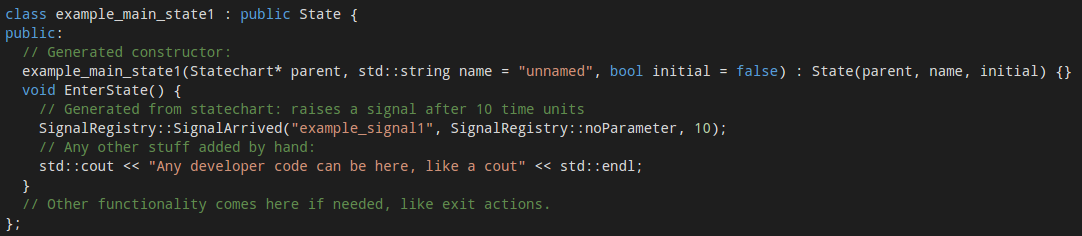
This method preserves the hierarchy of the statecharts completely. As a specification might consist of multiple statecharts, a statechart handler is responsible for the top level functionality. It works with a signal handler that connects the world to the environment – which handles the signal queues. Signal queues are one of the parts that has to be written by hand. It will mostly operate by either using shared memory (locking functions are built in) for the queues, or by attaching to a network interface to monitor packets, where certain packets raise certain signals. The statechart handler is responsible for the proper working of statecharts, which in turn contain states and transitions. These are all separate classes derived from a generic state and transition class, which allows the developers to extend the functionality of certain actions or guards. Names for states are also stored as strings which can be used to send informative error messages. For example, a state with a built in, and a custom entry action is represented as follows:
The handling of time is delegated to a separate class. This uses standard C++11 timing features and a clock with millisecond resolution by default, but can be easily changed to platform specific solutions: three functions need to be replaced in the class, one for getting the current time, one for getting the current time with an offset (which is needed for timers), and the comparison function between two timestamps.
This allows the generator not only to be used for monitor generation, but as a general tool to create object oriented C++ code from statecharts. This naturally results in a larger codebase than a low level monitor would, which is usually problematic when running on embedded systems.
Monitors with low overhead
After we realised that a BeagleBone PRU (which is what we wanted the monitor to run on) only has 8kB of code memory, a low level monitor generator had to be implemented. Code for handling hierarchy was the first to go – flat statecharts are just as good as hierarchical ones, when the memory limit is 8kB. The statechart names can also be omitted – even if it’s a less friendly method for the eye, storing an ID is enough to be to trace back which error state was reached. Creating child classes for states is also unacceptable overhead on such a small system, so we decided to use a general state class with function pointers. C++11 compilers are also seldom on embedded systems, so the code was downgraded to be C++98 compliant (which is the reason why no nice looking initialization lists are used). Then a single function running in an infinite loop checks for any changes in the signal que (in shared memory), and takes timesteps accordingly.
By now, you should have quite a bad feeling about how such code might look like. Well, wait no more, here is a small part from an example statechart, which shows how a transition is handled and the monitoring code is built:
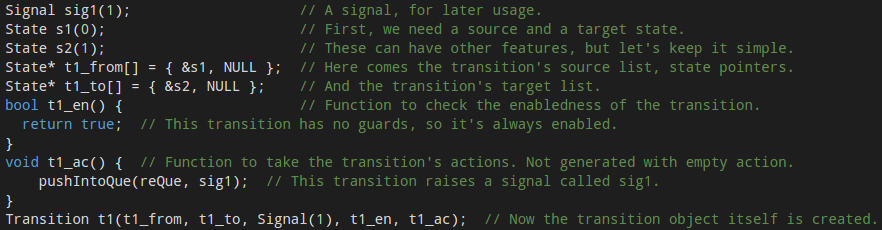
Looks horrible, right? Still: that’s how low level monitors for embedded systems are born.